Contact Me

Total Pageviews

Friday 27 June 2014

SSRS Reports using RDB class in Dynamic AX (Step wise explanation of Reports Generation)


Hi,
              I am excited to share this new source of data[RDP] for the dataset..We all know in the older version, for a dataset we had only Query and Business logic as a dataset source in SSRS reports. Now in the current version, we have actually 4 options : Query, Business Logic, Report data provider and AX Enum provider.

Today, I will be covering the Report data provider. An RDP class is an X++ class that is used to access and process data for a Reporting Services report. An RDP class is an appropriate data source type when the following conditions are met.
hmmmm.. confused..let me explain with an example. It will be all clear soon 
First things first: The following elements are required to set RDP as your data source type.
step 1: Query
step 2: Temporary table – RDP class fills a temporary table with data that will be used by Reporting Services to display the report.
[msdn help]
step 3:Data contract class – To define the parameters in the report.
step 4:Report data provider class – processes business logic based on parameters and a query, and then returns the tables as a dataset for the report. [msdn help]
/*********************************************************************/
Let me explain all the steps mentioned above with an example
For step 1: Create a new query by name DNSalesInvoiceQry and add the datasource as
                                            
 Next step 2: Let us create a new temp table by name DNSalesInvoiceTmp and add fields as shown below. Ensure that you set the Table type propert as TempDB or InMemory
Use an InMemory temporary table if the dataset is small, for reports that will display fewer than 1000 records.
Use a TempDB temporary table for large datasets to improve performance.
                             
Step 3: Now we need to Data Contract class – which will help to define parameters in the report.

Create a new class by name "DNSalesInvoiceContract" and add a SalesId global variable as shown below 
class DNSalesInvoiceContract
{
    SalesId salesId;
}
______________________________________________
Add one more parm method to it as shown below 
[
    DataMemberAttribute("SalesId")
]
public SalesId parmSalesId(SalesId _SalesId = salesId)
{
    SalesId = _SalesId;
    return salesId;
}
________________________________________________

Step 4:
DP class follows..
/// <summary>
///    Declares variables and tables for the <c>AssetBookCompare</c> report.
/// </summary>
[
    SRSReportQueryAttribute(querystr(DNSalesInvoiceQry)),
    SRSReportParameterAttribute(classstr(DNSalesInvoiceContract))
]
public class DNSalesInvoiceDP extends SRSReportDataProviderBase
{
     DNSalesInvoiceTmp DNSalesInvoiceTmp;
    SalesId           SalesId;

 }
___________________________________________________________________
private Query buildQuery(    Query                   _query,
                             SalesId                _SalesId)
    {
    if(_SalesId)
        _query.dataSourceTable(tablenum(SalesTable),1).addRange(fieldnum(SalesTable, SalesId)).value(_SalesId);
        //_query.dataSourceTable(tablenum(SalesLine), 1).addRange(fieldnum(SalesLine, SalesId)).value(queryvalue(_SalesId));
        //_query.dataSourceTable(tablenum(CustInvoiceJour), 1).addRange(fieldnum(CustInvoiceJour, SalesId)).value(queryvalue(_SalesId));

        return _query;

    }
__________________________________________________________________
private void getReportParameters()
{
    DNSalesInvoiceContract SalesInvoiceContract = this.parmDataContract();
    SalesId         = SalesInvoiceContract.parmSalesId();

}
_____________________________________________________________________
// <summary>
/// Executes temporary table.
/// </summary>
/// <returns>
/// The temporary table <c>LedgerJournalTmp</c>.
/// </returns>
[
    SrsReportDataSetAttribute(tablestr(DNSalesInvoiceTmp))
]
public DNSalesInvoiceTmp getTempData()
{
    select DNSalesInvoiceTmp;
    return DNSalesInvoiceTmp;

}
_____________________________________________________________________
private void insertTempData(SalesTable _SalesTable,SalesLine _SalesLine,CustInvoiceJour _CustInvoiceJour)
{
    SalesLine   SalesLineloc;
     int m;
    select _CustInvoiceJour where _CustInvoiceJour.SalesId == _SalesTable.SalesId;
    //while select _SalesLine where _SalesLine.SalesId == _SalesTable.SalesId
    //{
    DNSalesInvoiceTmp.SalesId           = _SalesTable.SalesId;

    DNSalesInvoiceTmp.CustAccount       = _SalesTable.CustAccount;
    DNSalesInvoiceTmp.InventLocationId  = _SalesTable.InventLocationId;
    DNSalesInvoiceTmp.SalesOrderDate    = _SalesTable.createDate();
    DNSalesInvoiceTmp.CurrencyCode    = _SalesTable.CurrencyCode;
    DNSalesInvoiceTmp.WorkerSalesResponsible    = _SalesTable.WorkerSalesResponsible;
    DNSalesInvoiceTmp.InvoiceDate    = _CustInvoiceJour.InvoiceDate;
    DNSalesInvoiceTmp.InvoiceId    = _CustInvoiceJour.InvoiceId;
    DNSalesInvoiceTmp.ItemId    = _SalesLine.ItemId;
    DNSalesInvoiceTmp.SalesQty    = _SalesLine.SalesQty;
    DNSalesInvoiceTmp.SalesPrice    = _SalesLine.SalesPrice;
    DNSalesInvoiceTmp.LineAmount    = _SalesLine.LineAmount;
    DNSalesInvoiceTmp.Logo          =  Companyimage::findByRecord(CompanyInfo::find()).Image;
    DNSalesInvoiceTmp.Warehouse     =   InventLocation::find(DNSalesInvoiceTmp.InventLocationId).Name;
    DNSalesInvoiceTmp.SalesResponsibleID = Hcmworker::find(DNSalesInvoiceTmp.WorkerSalesResponsible).PersonnelNumber;
    DNSalesInvoiceTmp.SalesResponsibleName = Hcmworker::find(DNSalesInvoiceTmp.WorkerSalesResponsible).name();
    DNSalesInvoiceTmp.ItemName  =   InventTable::find(DNSalesInvoiceTmp.ItemId).itemName();
    DNSalesInvoiceTmp.CustName  =   CustTable::find(DNSalesInvoiceTmp.CustAccount).name();
    DNSalesInvoiceTmp.CustAddress   =   CustTable::find(DNSalesInvoiceTmp.CustAccount).address();
    DNSalesInvoiceTmp.AddressCity   = Dirparty::primaryPOstalAddress(CustTable::find(DNSalesInvoiceTmp.CustAccount).Party).City;
    select sum(LineAmount) from SalesLineloc where SalesLineloc.SalesId == _SalesTable.SalesId;

    m = strLen(numeralsToTxt_in(SalesLineloc.LineAmount));
        //strDel(numeralsToTxt_in(_SalesLine.LineAmount), m -5, m) +" "+ CompanyInfo::standardCurrency();
    DNSalesInvoiceTmp.StrLineAmount = strDel(numeralsToTxt_in(SalesLineloc.LineAmount), m -5, m) +" " + CompanyInfo::standardCurrency();
    DNSalesInvoiceTmp.insert();
    //}

}
__________________________________________________________________
[
    SysEntryPointAttribute(false)
]
public void processReport()
{
    SalesTable  SalesTable;
    SalesLine   SalesLine;
    CustInvoiceJour CustInvoiceJour;
    DNSalesInvoiceContract contract;
    QueryRun queryRun;
     this.getReportParameters();
    queryRun = new QueryRun(this.buildQuery(this.parmQuery(),SalesId));
     while (queryRun.next())
    {
        SalesTable = queryRun.get(tableNum(SalesTable)) as SalesTable;
        SalesLine = queryRun.get(tableNum(SalesLine))as SalesLine;
        CustInvoiceJour = queryRun.get(tableNum(CustInvoiceJour))as CustInvoiceJour;
        this.insertTempData(SalesTable, SalesLine, CustInvoiceJour);
     }

}

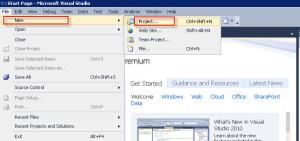
Open visual studio. Click on File >> New project and follow the below process. 
                               
Now add a new report to the report model by right clicking and selecting new report as shown below 
                                
Rename the report to "SR_CustTableRDPReport" as shown below by going to the properties of the report

                               
Now the next thing what we have to do [the most awaited...] is to create a dataset for this report.
Right click on the DataSet and add new dataset as shown below. Rename it to CustomerDataSet as shown below 
                                        
Go to its properties and rename it to "CustomerDataSet" 
                                      
Now the real trick, we have a datasource type property on the dataset properties. Select report data 
provider as the datasource type as show below. 
                                      
This will come up with all the RDP classes available in AX. Select SR_CustTableRDP Class and click on next button to select the fields from the tmpTable to shown it on the report. 
                                     
Follow the below screen shot to select the fields and click on Ok button 
                                    
wonderful..we are done with dataset..Only few steps now..Now we need to create design. Drag and drop this CustomerDataSet to Designs node. It will automatically create the Autodesign1 as shown below 
                                   
Few more properties for good look and feel of reports : Right click on the Autodesign1 and set the
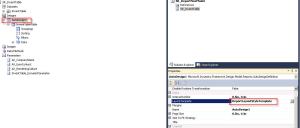
LayOutTemplate as ReportLayoutStyleTemplate as shown below
                                    
Then set the style template as TableStyleTemplate as shown below 
                                
Also, since I dont have data in default DAT Company, I would like to use company parameter as well. so I am unhiding the company parameter to select the company parameter along with the Account number [step 3 parameter]
To do this, follow me and change the hidden property to visible as shown below for company parameter 

                              
Thats it..Now let us run this report.

Right click on the Autodesign1 and select option Preview and select the parameters as shown below 
                               
Select the report Tab to view the report. It will take some time to render data.
                              
Here comes the final data on the report – from the RDP class by inserting in to temporary table and showing the same on to report.
                                
                               
hmmmm.. I am done..Hope you understood how RDP classes will help to render the data on to report by using the temporary table concept and Data contract classes. In my last post I have explained how to add this report to the AX menu item.. Follow the same process and check the report by opening from within AX.
Happy Daxing guys ;)

Wednesday 18 June 2014

Creating Simple SSRS Reports in AX 2012 using Ax Query as Datasource

Hi Friends,
Today, let us learn how to quickly create report models and report in Visual studio and add to AOT[Dynamics AX 2012] and see a running report.
Some information:
In a Visual Studio reporting project for Microsoft Dynamics AX, you can define a report in a report model. A report consists of a collection of items, such as datasets, parameters, images, and report designs. A model can contain more than one report.
Also, for this post I am assuming that all report services are configured in the system.
Let us create a query in AOT as a dataset source for our report.
Create a new query by name – “SR_InventTableQuery” and add InventTable as datasource and add ItemId range to it. I will let you know the significance of adding the range as I proceed further..
So, your new query should like below :
Please note: we can use already existing queries which are in AOT for report as datasource, for better understanding I have created new query above.
Lets proceed further. Open visual studio 2010 and lets us create a new Dynamics AX project.
Once visual studio is launched >> click on file menu >> New project as shown below
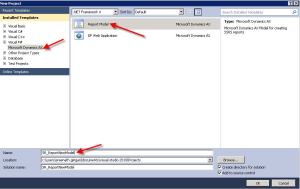
Select Microsoft Dynamics AX from the installed templates >> report model and name the model as SR_ReportNewModel as shown below
Now let us add a new report to the newly created report Model as shown below. Right click on the SR_ReportNewModel from the solution explorer, Add >> Report
Rename the report to SR_InventTable by right click and rename option on the newly added report.
Then we need to add the dataset to the newly created report. Right click on the datasets node and chose the option New datset. Rename it to InventTable and go to query property and click on the ellipsis (…) button to select the query which we have created as shown below [picture explains better than 1000 words]
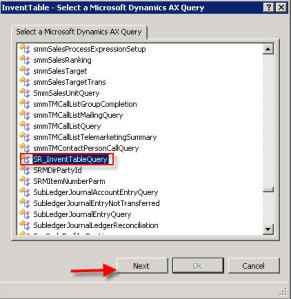
It will open with list of Dynamics AX Queries from which we should select our query “SR_InventTableQuery” and click on next button as shown below
Now , you can select the list of fields and display methods you want to see on your report.
I have selected few fields form the fields and also couple of display methods like site Id and location Id as shown below and click on Ok Button.
wow..There you go… we are done with the datasets part and lets work on the design part real quick now…
Its very simple..Select the InventTable dataset and drag and drop on to your designs node as shown below. It will create autodesign for you :)
In my case, when I expand the designs node, i see my fields and the data methods added in the data nodes. we will look in to other nodes in detail later.
Well there are now some important [not mandatory] properties but beautification properties which make your report look good with style. Once you expand the designs node, you will find InventTableTable with the dataset name. Right click on it and go to properties and set the style template to “TableStyleTemplate” as shown below.
On to autodesigns, we also need to set an important property called Layout Template – set it to ReportLayoutStyleTemplate as shown below
Now, lets switch to parameters node in the report. If you expand the parameters node , you will find some parameters. Lets work on AX_CompanyName parameter. By default it is hidden. Lets unhide or make it visible it as we want to display the items based on the company [dataaread id] selection by the user.
See the screen shot below
wow..we are getting closer. Now we can preview the data by right clicking the autodesign and by chosing option preview as shown below
Note: you can select the company parameter and click on the report tab to view the report. But our main aim is to deploy back this report model to AX.
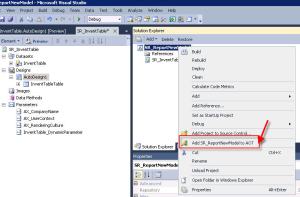
To deploy the report to AOT, we have a very simple option. Right click on the SR_ReportNewModel from the solution explorer and select option Add SR_ReportNewModel to AOT as shown below.
We are done with visual studio development part. Now lets us switch to AX and see whether the report model has been saved to AOT or not. To do so, open your AX client and go to AOT >> Visual studio projects >> Dynamics AX Model projects . you should see SR_ReportNewModel project.
Also, In AOT >> SSRS Reports >> Reports >> you should see SR_InventTable report.
Now we are left out with final thing, creating menuitem for this report. This can be easily done by following the below process.
Go to AOT >> Menu items >> Output >> Right click and Select New Menu item and set the following properties as shown below.
Cool.. we are done and hope you are excited to view the report now. Well you can add this menu item to relevant menu and I hope you knw this process.
Now , lets open the report, Right click on the newly created menu item and select open.[You should see the following as shown below]
Since we have made the company parameter visible- we have option of generating the report based on the dataareaId and since we have added range ItemId to the query – we get two ranges as shown above.
I have selected ceu as my company and I am leaving ItemId as blank to view all the items in the report. Now lets run the report and see how it renders the data. [Below is the report]

Happy Daxing Guys:)

AX 2012 SSRS Reporting Architecture


  The following diagram illustrates how a report is rendered in Microsoft Dynamics AX.

Reporting architecture
To better understand how a report is rendered, review the following steps:
  1. A user requests a report.
    A menu item in the Microsoft Dynamics AX client may be bound to a report for Reporting Services. After a user clicks the menu item, a parameters form is displayed to the user. The user enters parameters to filter the data that is displayed on the report.
    The Microsoft Dynamics AX client then requests the report from an instance of Reporting Services. The request includes the parameters that the user entered.
  2. Reporting Services receives the request and requests the report data from the Microsoft Dynamics AX server.
    Reporting Services receives the request and examines the report. The report is stored as an .rdl file. The .rdl file indicates the report’s data source. The data source may be a Microsoft Dynamics AX query, a report data provider class, or an external data source that is accessed through report data methods.
    If a Microsoft Dynamics AX data source is used for the report, Reporting Services uses the Microsoft Dynamics AX data extension to retrieve the data.
    Reporting Services then requests metadata about the data source from Microsoft Dynamics AX. Then Reporting Services requests the data for the report.
  3. The Microsoft Dynamics AX server receives the request and sends the report data back to Reporting Services.
    The Microsoft Dynamics AX services examine the query in the Application Object Tree (AOT) to return the requested metadata. The services also run the query to generate the data for the report.
    Microsoft Dynamics AX then returns the metadata and data to Reporting Services.

  4. Reporting Services renders the report and sends it to the Microsoft Dynamics AX client.
    The Microsoft Dynamics AX customization extension formats the report. The customization extension uses metadata to provide automatic formatting of data and can affect the positioning and layout of elements on the report.
    Reporting Services then renders the report into a visual representation and sends that representation to the Microsoft Dynamics AX client.
  5. The report is displayed to the user.
    The Microsoft Dynamics AX client displays the report to the user in the report viewer control.
Happy Daxing :)

Tuesday 17 June 2014

X++ Reports/AOT Reports [MorphX reporting Framework ] and Why SSRS ?

To justify the shift to SSRS, let's understand the drawbacks of the MorphX Reporting framework 

1)It was a client side solution that means the framework needs to be installed in the client system.
It uses the capabilities of the client to print a report.

2)The system works only with tables in AX. It cannot be connected to an external database or a web service.

3)The reports cannot be exposed outside the AX client that means the report can only be viewed through the AX client.

4)The rendering reporting framework is very weak when it comes to graphical, tabular, and interactive reports.


AX 2009 versus AX 2012

SSRS has evolved as a mature framework for Dynamics AX. Here is a listing of the major
changes that came through the latest version in comparison to the previous version.

AX 2009                                                                         AX 2012
Used .Net business connector to communicate             Uses the Dynamics AX services
to Dynamics AX                                                              framework (system services/
                                                                                       metadata services/document                                                                                                                      services) to  dynamics Ax.                                             

Control formats had to be defined explicitly                   Control formats are derived from
                                                                                       the corresponding types EDT/fields

Large data sets are first stored in a data table                Data streaming is possible that
and then rendered causing a delay in loading                 enables data to be read in pages
of the reports                                                                   or streams of data                                                                
                                                                                       

Limited interactivity and no charting capabilities            Rich charting and interactive
                                                                                       capabilities

Labels for each locale had to be created                        Standard AX labels can be
separately as a .resx file                                                  referenced and the framework
                                                                                        translates them according to the
                                                                                        locale

                              
One report for each locale (English, Arabic,                 Only one report is created and is
 and so on) was created                                                   rendered in different languages


Record-level security didn't apply to report data             The entire security model (duties,
                                                                                        privileges, and XDS) is honored by
                                                                                        the reports

Deployed through the project deployment form.           Uses PowerShell to deploy reports
No Cross reference for reports                                      Reports are cross referenced

So,the SSRS reporting framework of Ax 2012 is more powerful and interactive than Ax 2009 SSRS reporting Framework.

That's it !
Happy Daxing ;)

Thursday 12 June 2014

Installation and Configuration of AX 2012 (Part 1)

Hi all,

Today,I have published this post to provide you with a step by step Installation and Configuration of Ax 2012.

The Installation of Ax 2012 is very straight forward and its just about clicking "NEXT" again and again.

Server Setup :

So,to begin with I will first discuss Server Setup for installing Ax 2012.Minimum server components include your Database server and your AOS.Though, a single server Implementation of Ax 2012 is also possible but it is not for production environment.

Installation Types

Two installation types are available from the Setup wizard: Custom installation
and single-computer installation.
• Choose custom installation to select specific Microsoft Dynamics AX components to install on multiple computers. Use this installation type in a production environment.
• Choose single-computer installation to install a complete Microsoft
Dynamics AX system on one computer.

IMPORTANT: Do not use the single-computer installation in a production
environment. Use this installation type only for development and testing.


RAID Subsystem

With an Enterprise Resource Planning (ERP) system such as Microsoft
Dynamics AX 2012, the database server generally stores a very large amount of
important data for the business. If this data is unavailable for any length of time,
the business could experience significant financial losses. Using a Redundant
Array of Independent Disks (RAID) can help reduce the possibility of this loss
from occurring. Another important aspect for a database server is fine tuning for
optimal performance. A RAID disk subsystem can also be used to help achieve
this goal.
RAID refers to a group of two or more disks managed as a single unit to store the
data together with additional, or redundant, information to provide recovery if
there is a disk failure. Usually a failed disk in a RAID system can be replaced
while the server is still running. This is one benefit of RAID.

Additional Info:
All the Microsoft Dynamics Ax 2012 components are supported on 64-bit OS.
A AX Client communicates with AOS using Remote Procedure Calls (RPCs)
Windows Communication Foundation (WCF) or AOS services.


Install a Test environment
Now,lets try to Install a Test Environment.In this environment I only need a database, and
AOS component of AX 2012.When I am finished, will create  a configuration file and then connect to the environment to make sure the installation worked.


Step by Step :
To install a Database in AX 2012, follow these steps:

1) Start the Setup Wizard.
Initial Setup Screen


2. Click Microsoft Dynamics AX components.
3. Click Next.
4.If the Setup Support files have not yet been installed on the computer, the Select a file location page is displayed. The Setup Support files are required for installation. Enter a file location or accept the default location, and then click Next. On the Ready to install page, click Install.
5. On the Select installation type page, click Custom installation, and then click Next.


6. Select Add or modify components, then click Next.
7. Select Databases, and then click Next.


7. Wait until Prerequisite Validation has run, then click Next.


8.On the Select database page, select the name of the computer that is running SQL Server from the Server name list. Provide a database name or accept the default database name of
MicrosoftDynamicsAX, and then click Next.


9.On the Select additional models page, select models from the
Available Models grid. Setup lists all the models in the Standard
folder and all its subfolder. Setup automatically selects the models
from the Standard folder, such as the SYS model, and you cannot
clear the selection. Select additional models that need to be installed,
if any. Click Next to continue.


10. Confirm that Setup installed the Microsoft Dynamics AX database
successfully. In case of errors, click View log file and review the
installation log for the Microsoft Dynamics AX database. Click
Finish to close Setup.

Demonstration: Install an AOS Instance

1. Start Microsoft Dynamics AX Setup. Under Install, select Microsoft
Dynamics AX components.
2. Step through the initial wizard pages.
3. If the Setup Support files have not yet been installed on this
computer, the Select a file location page is displayed. The Setup
Support files are required for installation. Provide a file location or
accept the default location and then click Next. On the Ready to
install page, click Install.
4. On the Select instalAXlation type page, click Custom installation,
and then click Next.
5. On the Select components page, select Application Object Server

(AOS), and then click Next.
6. On the Prerequisite Validation page, resolve any errors. When all
errors are resolved, click Next.
7. On the Connect to a Microsoft SQL Server database page, in the
Server name box, type or select the name of the SQL Server
computer. In the Database name box, type or select the name of the
Microsoft Dynamics AX database.
8. On the Configure an Application Object Server (AOS) instance
page, assign a name to the AOS instance. Optionally, you can
specify the following ports:


TCP/IP port -> Used by other Microsoft Dynamics AX               -> 2712(Default)
                         components to communicate with the AOS.

Services      ->  Used by external applications to access the          ->  8101(Default)
WSDL port      WSDL for AOS-based Microsoft Dynamics
                         AX web services.

Services      ->  Used by external applications to access                ->  8202(Default)
endpoint port    AOS-based Microsoft Dynamics AX web
                         services.

9. If you are installing a second AOS instance on a server, you must
specify unique port numbers. By default, each time that you install
an additional AOS instance on a computer, the port numbers
increment by one. For example, the second AOS instance on a
computer would be assigned to TCP/IP port 2713 by default. Port
conflicts can cause one AOS to stop.
10. On the Specify an AOS account page, select either the Network
Service account of the local computer or a domain account for the
AOS service.


11. The AOS Windows service can take several minutes to start the first
time after it is installed. To determine whether it has started, open
Administrative tools > Services, and review the status of the
Microsoft Dynamics AX Object Server service.


Install multiple AOS instances on one computer :

Multiple AOS instances can be installed on the same computer, which is useful in
some testing and development scenarios. For example, if you are developing for
multiple versions of Microsoft Dynamics AX, you can install different versions
of the AOS side-by-side. Install each AOS instance as described in the
"Demonstration: Install an AOS Instance" but specify a different port number and

a unique name for each instance.

Demonstration: Install a Client

Use this procedure to install a Microsoft Dynamics AX client using the Setup

wizard.Install the Microsoft Dynamics AX databases and the AOS instance in the
environment.

1. Start Microsoft Dynamics AX Setup. Under Install, select Microsoft Dynamics AX Client.
2. Step through the initial wizard pages.
3. If the Setup Support files have not yet been installed on this computer, the Select a file location page is displayed. Provide a file location or accept the default location and then click Next. On the
Ready to install page, click Install.
4. On the Select installation type page, click Custom installation, and
then click Next.
5. On the Select components page, select Client. and then click Next.
6. On the Prerequisite Validation page, resolve any errors. When all
errors are resolved, click Next.
7.On the Select client preferences page, specify the initial settings for
the client. Select a display language, select a workspace type, and
specify whether Setup should create a desktop shortcut. Click Next.


8.On the Client configuration options page, specify whether the
client will use individual configuration settings or a shared
configuration file.

9. Click Next.
10. On the Connect to an AOS instance page, enter the name of the
computer running the AOS instance to connect to. You can
optionally specify the AOS instance name, the TCP/IP port number,
and the services WSDL port. If you do not know the name of the
Application Object Server or the port information, contact the
Microsoft Dynamics AX administrator. Click Next.
11. On the Prerequisite validation results page, resolve any errors.
12. When there are no errors, click Next.
13. On the Ready to install page, click Install.


Procedure: Create Configuration File

1. Open the Microsoft Dynamics AX Client Configuration utility
(Start > Administrative Tools > Microsoft Dynamics AX
Configuration).
2. In the Configuration target list, select Local client.
3. Click Manage, and then click Create configuration.
4. In Configuration name, type a name for the configuration.
5. In Copy Configuration from, select either "Active configuration" or
"Original configuration", then click OK.
6. On the General tab, select Company and type "CEU".
7. On the General tab, select Startup message and type "Test
environment."
8. On the Connection tab, validate the connection settings to the AOS.
9. On the Developer tab, validate the settings for breakpoints and the
application layer.
10. On the Performance tab, validate the settings for client
performance.
11. Click Manage, and then click Export Configuration to File. Name
and save the configuration file.
12. Click OK to exit the configuration utility.


Now,you can open the client successfully.
Happy Daxing :)