Contact Me

Total Pageviews

Tuesday 8 July 2014

AX 2012: SSRS Report Drill Through Action URL

In this post we’ll learn how to add a drill through action URL to a field in an SSRS report. The focus will be more towards exploring drill through action URL rather than developing SSRS report. We’ll be using an RDP report with precision design to demonstrate the development.
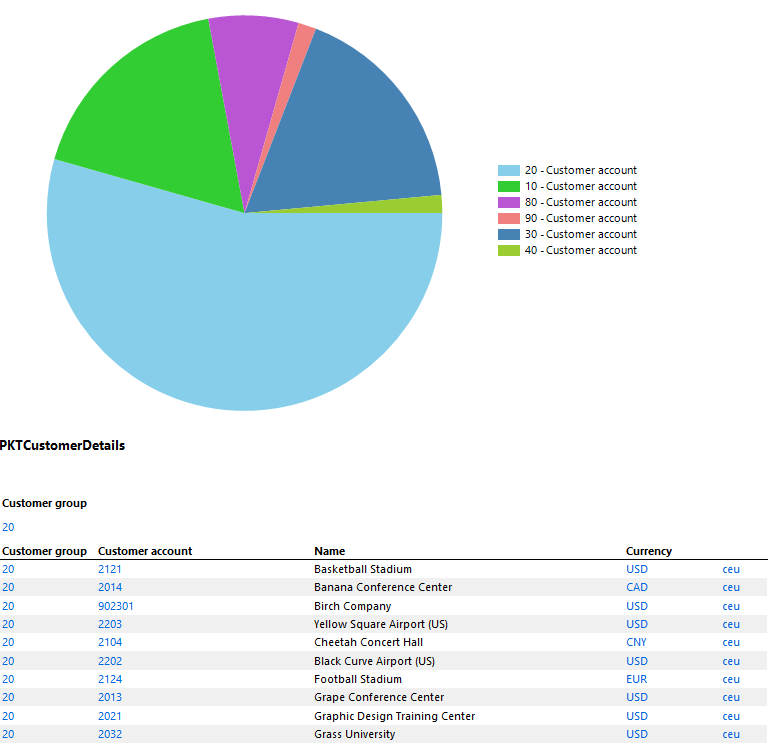
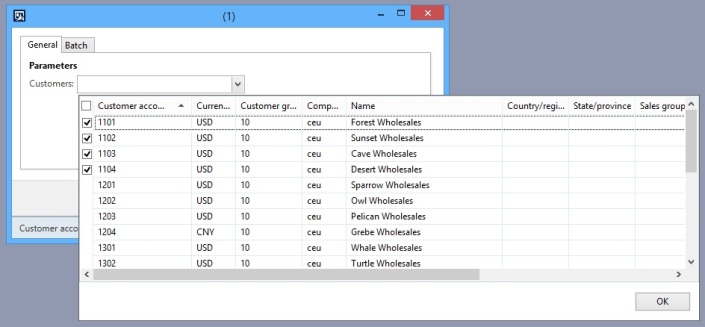
Let’s say we have a requirement to open HcmWorker form when user clicks on the Name of the worker in the SSRS report. Before adding the drill through URL our simple report looks like below showing list of workers:
To add the drill through URL to open HcmWorker form on clicking Name field on the report, please follow the development steps below:
1. Open the Visual Studio project of the report.
2. Go to Application Explorer > Visual Studio Projects > C Sharp Projects > SRSDrillThroughCommon.
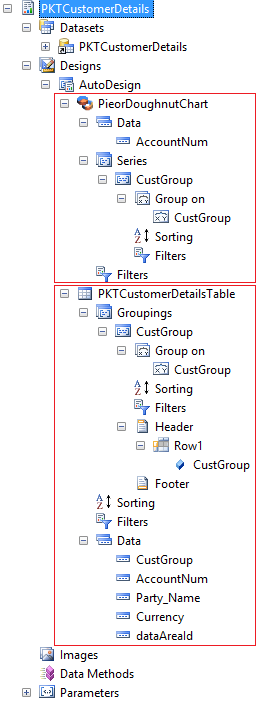
3. Right click and Edit the project. A project node for SRSDrillThroughCommon will be added in the Solution Explorer.

4. Open DrillThroughCommonHelper.cs and search for the pre-built drill through method to open HcmWorker form.

5. Expand HRM Helpers region. You’ll find a method ToHcmWorker(). We’ll be referring to this method in a while.

6. Now add a data method to the report drillHcmWorker. This will add a BusinessLogic project to the Solution Explorer.

Untitled
7. Add reference of SRSDrillThroughCommon project to MAKHcmWorker.BusinessLogic project.
Untitled
8. Open MAKHcmWorker.cs and add namespace using Microsoft.Dynamics.AX.Application.Reports.
9. Rewrite the drillHcmWorker() method to have the following definition:
using System;
using System.Collections.Generic;
using System.Security.Permissions;
using System.Data;
using Microsoft.Dynamics.Framework.Reports;
using Microsoft.Dynamics.AX.Application.Reports;

public partial class MAKHcmWorker
{
    [DataMethod(), PermissionSet(SecurityAction.Assert, Name = "FullTrust")]
    public static string drillHcmWorker(string reportContext, string personnelNumber)
    {
        return DrillThroughCommonHelper.ToHcmWorker(reportContext, personnelNumber);
    }
}
10. Now edit the precision design using Designer. Select Name field to access its Action property.


11. Click on the ellipsis icon. In the hyperlink options, choose Go to URL.

12. Give the following expression:
=drillHcmWorker(Parameters!AX_ReportContext.Value, Fields!PersonnelNumber.Value)
13. Change the font color to Blue.
14. Access properties of MAKHcmWorker.BusinessLogic project. Set Deploy to Client to Yes.
15. Access properties of SRSDrillThroughCommon project. Set Deploy to Client to Yes.
16. Build and Deploy the report.
We are good to run the report to see the drill through URL in action :)
 Happy Daxing :)

Monday 7 July 2014

Report Development Basics in AX 2012 - Drill Through Options

Today I wanted to take some time and start back focusing on BI & Report Development topics for Microsoft Dynamics AX 2012. This is one area that helps us shape Microsoft Dynamics AX 2012, into a true System of Engagement for customers. 

Today I wanted to talk about the ability to perform a drill through action from one report, to another source in AX 2012. 


This is a popular possibility, that enables one to create an engaging report experience for launching from a more summarized report data - into the details such summarized reporting represents. 

We see this in action with AX 2012, via Web Parts for Enterprise Portal. These are most always hosting AX-SSRS chart based report objects, or other forms of grouped and summarized data. Usually clicking on the details of the value being summarized in the report, will take you to a more detailed transaction view of the data it is meant to represent. 

There are two options, when we look at the Drill Through possibilities, either Report Drill Through Action or URL Drill Through Action. As the names imply each will either launch another report, or launch a new browser directed at the specific URL to be viewed, when clicked by the user. 


In order to work with a targeted Report for drilling through too, it has to be referenced either within the same model project - of opened within the same solution design space. You can see this with the two report objects I have shown above. 


Doing this will enable for you to have a source, or drill from, as well as a target or drill through report objects. We can see in the above image that I have a selection of either Report1 design or Report2 design. Since Report1 is my source object, I will select Report2 Autodesign. 


Having done this, as you see above, I now have my Report Drill Through Action along with parameters that I need to set. Usually the auto-generated parameters like company, report culture, etc can be passed through from the source report object. However this is where a target report object, of the drill through action, can have it's report output shaped by context of the data from the source. 

Moving right along from here, we have the URL Drill Through Action. As with the report drill through action, the URL is added from the fields on the design of a report. In doing this, we see in the following options for our URL Drill Through Action. 


As the above image suggests, we have the ability to pass any number of URL's, along with parameters that can be dynamically driven from the source report object. A good example would be a report that had tracking information, and you wanted to automatically fire into UPS site from the report, and have it show the status of a package. 

All-in-all, the drill through actions we have when talking in terms of report development for Microsoft Dynamics AX 2012 help us create more engaging reporting experiences for users. This is the ultimate goal, to engage the user with needed and critical information, for solid execution of their roles responsibilities. 

That's all for this post. Check back soon however as a lot more to come! Till Next Time! 
Happy Daxing :)

Sunday 6 July 2014

AX 2012: Chart in SSRS Report

In this post we’ll learn how to create data visualization in SSRS report using Pie or Doughnut chart. We’ll be creating a query based AutoDesign report. This is how our report will look like at the end after following the mentioned development steps:
Untitled

Steps:

1. Create a new Query in the AOT. Name it as PKTCustomerDetails.
2. Add CustTable table to the Data sources node of query.
3. On the Fields node of CustTable, set the Dynamic property to Yes. This will add all the table fields to Fields node.
4. Set the Dynamic property to No and then remove unwanted fields to make the query light and report efficient. This way we can add fields quickly :)
Untitled
5. We are done with the query now. Let’s design report in Visual Studio.
6. Open Visual Studio and create a new project using Microsoft Dynamics AX installed template. Name it asPKTCustomerDetails.
Untitled
7. Right click the project node in the Solution Explorer, click Add > Report. Rename the report toPKTCustomerDetails.
8. Add new Dataset to the report. Rename the dataset to PKTCustomerDetails.
9. Set the Query property of the dataset to the newly created AOT Query PKTCustomerDetails.
Untitled
10. Select all the fields of the query.
11. Drag the newly added dataset to the Designs node. This will automatically an AutoDesign to the report. Moreover a table will also be added for the dataset having all the fields in the Data node.
Untitled
12. Drag the CustGroup field from dataset to the Groupings node of the table to group data by CustGroup field.
13. Preview the report. Your report should look like below:
Untitled
14. Now we’ll add Pie chart to our report to show total Customers per Customer Group.
15. Right click on the AutoDesign to add a Pie chart
Untitled
16. Rearrange Pie chart so that it comes before table in the AutoDesign.
17. Drag AccountNum field from dataset to the Data node. Set its properties as shown below.
Untitled
19. Drag CustGroup field to the Series node.
20. By now your report structure should look like as shown below.
Untitled
21. You may preview the report now to see multiple data regions in action – Pie chart and table.
22. Now Build and Deploy the report from Visual Studio.
Untitled
23. Go back to AX development workspace. PKTCustomerDetails report should be coming in AOT > SSRS Reports.
24. Create an Output menu item for the report PKTCustomerDetails.
25. We are good to view our report from within AX now by clicking the newly created output menu :)
Untitled

Saturday 5 July 2014

Filtering multi select dialog based on another multi select dialog


Hello,

We have already done filtering a dialog based on another dialog. We are doing it again but with one difference which is now we are using multi select drop down.

In this post I am taking the same example which I used in my previous post. However, I've now made the 2 dialogs as multi-select which I already discussed in my first post. you can check it here.


After changing the single select dialog box to multi select, I first declared a List variable in the class declaration method. i.e.,

    List selectedGroup;


This selectedGroup variable holds the values of customer groups which were selected by the user.


I also created a method custGroupModified in my custReportUIBuilder class. Since themodified event do not work with multi select dialogs, so I am changing it to leave event. So first I changed the custGroupMidified method to custGroupLeave and put the following code in it

public boolean custGroupLeave(FormStringControl _control)

{

    if (_control.valueStr() != '')

    {

        selectedGroup = strSplit(_control.valueStr(), ';');

        dialogCustGroup.value(selectedGroup);

    }

    return true;

}


Now in the custLookup method we will use the selectedGroup list variable to filter the customers. So, adding the following code in the method:

    if (selectedGroup)

    {

        enum = selectedGroup.getEnumerator();

        while (enum.moveNext())

        {

            query.dataSourceTable(tableNum(CustTable)).addRange(fieldNum(CustTable, CustGroup)).value(enum.current());

        }

    }


Where the variable enum is the list enumerator and which is defined in the method as:

    ListEnumerator enum;


The whole method will look like this:

public void lookupCust(FormStringControl _control)

{

    Query query = new Query();

    container cnt;

    ListEnumerator enum;


    query.addDataSource(tableNum(CustTable));

    query.dataSourceTable(tableNum(CustTable)).fields().addField(fieldNum(CustTable, AccountNum));

    query.dataSourceTable(tableNum(CustTable)).fields().addField(fieldNum(CustTable, Party));


    if (selectedGroup)

    {

        enum = selectedGroup.getEnumerator();

        while (enum.moveNext())

        {

            query.dataSourceTable(tableNum(CustTable)).addRange(fieldNum(CustTable, CustGroup)).value(enum.current());

        }

    }

    SysLookupMultiSelectGrid::lookup(query, _control, _control, cnt);

}


One last thing is to change the override method of dialogCustGroup’s leave method. I’ll do it in the postBuild method:

    dialogCustGroup.registerOverrideMethod(methodStr(FormStringControl, leave),methodStr(custReportUIBuilder, custGroupLeave), this);


and the whole method will look like this:

public void postBuild()

{

    super();

    // From binding info, get the dialog field for racecode attribute and add button

    dialogCustGroup = this.bindInfo().getDialogField(

                         this.dataContractObject(),

                         methodStr(custReportContract,parmCustGroup));

    // register override method for lookup cust Group

    dialogCustGroup.registerOverrideMethod(methodStr(FormStringControl, lookup),methodStr(custReportUIBuilder, lookupCustGroup), this);

    // register override method for modified

    dialogCustGroup.registerOverrideMethod(methodStr(FormStringControl, leave),methodStr(custReportUIBuilder, custGroupLeave), this);


    if (dialogCustGroup)

    {

     dialogCustGroup.lookupButton(2);

    }


    //binding info for customer drop down

    dialogCust = this.bindInfo().getDialogField(

                         this.dataContractObject(),

                         methodStr(custReportContract,parmCust));


    // register override method for lookup customer

    dialogCust.registerOverrideMethod(methodStr(FormStringControl, lookup),methodStr(custReportUIBuilder, lookupCust), this);


    if (dialogCust)

    {

        dialogCust.lookupButton(2);

    }


}


That’s it, we are now done. Thank you all
Happy Daxing :)

Friday 4 July 2014

Creating multi-select lookup dialog for SSRS report parameter in MS Dynamics AX 2012

Hello All,
I just recently found a way to create a multi select lookup
dialog for SSRS report parameter using SysLookupMultiSelectGrid
class. I thought it might be helpfull for other developers
as well since I couldn't find any other Blog or Post answering this issue.

I am just assuming that you know how to create a simple dialog
for reporting parameter. However, if you don't know this link might be helpfull to you.http://www.artofcreation.be/2011/08/22/ax2012-sysoperation-part-1-data-contracts-and-service-operations/

I will just write those methods which will create a multi select
dialog. So, here we go.

Step 1:
In your data contract class declaration method, define your
parameter with 'List'. For example I want to create a multi select dialog for
customers in which I need Customer account to be selected when a user selects
any customer. SO, I will write

List accountNum;
In your DataMemberAttribue method type
the following code

[
DataMemberAttribute('AccuontNum'),
AifCollectionTypeAttribute('AccountNum', Types::String),
SysOperationLabelAttribute(literalstr("@SYS302"))
]
public List parmAccountNum(List _accountNum = accountNum)
{
accountNum = _accountNum;
return accountNum;
}
Your screen will look like this

Step 2:
Now that you have completed the contract class, let’s move on to
the UI Builder class. In your main lookup method write the following code.

public void
lookup(FormStringControl _control)
{
Query query = new Query(queryStr(CustTableSRS));
container cnt;
SysLookupMultiSelectGrid::lookup(query, _control, _control, cnt);
}
you may have to create 3 more methods to run your code without any
error. They are getFromDialoginitializeFields
and postRun. Here is the code for these methods. you have to change the contract class name with your
contract class

First create a new mothod for initializeFields and paste the following code
public void
initializeFields()
{
custMultiSelectContract contract = this.dataContractObject();
}
Then create another method for getFromDialog
public void getFromDialog()
{
custMultiSelectContract contract = this.dataContractObject();
super();
}
and then another method for postRun
public void postRun()
{
custMultiSelectContract contract = this.dataContractObject();
}
That's it. You are now done. Run your report and enjoy.
Thanks.
Happy Daxing:)

Thursday 3 July 2014

AX 2012: Multi-Select Lookup for SSRS Report Dialog


Hi all,

Multi-Select Lookup

n this post we’ll learn how to build multi-select lookup for SSRS report dialog. We’ll create an RDP report with an AutoDesign layout. Controller will be used to run the report. An output menu item will be created to point to the controller class. Each AOT element involved will be described in detail. You can guess the complexity of this development task by looking at the AOT elements required for it:
Multi-Select Lookup
Let’s develop them piece by piece…
1. MAKCustTable (Query):
Multi-Select Lookup
1. Create MAKCustTable query.
2. Drag CustTable table to the data sources node.
3. Select the fields as shown in the picture.

2. TmpMAKParameters (InMemory Table):
Multi-Select Lookup
1. Create InMemory table TmpMAKParameters.
2. Add the fields in the table as shown in the picture.

3. MAKParametersUIBuilder (UI Builder Class):
class MAKParametersUIBuilder extends SysOperationAutomaticUIBuilder
{
    DialogField     dialogCust;
}

public void build()
{
    MAKParametersContract   contract;

    contract = this.dataContractObject() as MAKParametersContract;
    dialogCust = this.addDialogField(
 methodStr(MAKParametersContract, parmCustAccountList),
 contract);
}

public void postBuild()
{
    MAKParametersContract   contract;

    super();

    contract = this.dataContractObject() as MAKParametersContract;

    dialogCust = this.bindInfo().getDialogField(
        contract,
        methodStr(MAKParametersContract, parmCustAccountList));

    dialogCust.registerOverrideMethod(
        methodStr(FormStringControl, lookup),
        methodStr(MAKParametersUIBuilder, custTableLookup),
        this);

    if (dialogCust)
    {
        dialogCust.lookupButton(2);
    }
}

private void custTableLookup(FormStringControl _control)
{
    Query       query;
    container   conCustTable;

    query = new Query(queryStr(MAKCustTable));

    SysLookupMultiSelectGrid::lookup(
 query,
 _control,
 _control,
 conCustTable);
}

public void postRun()
{
    //super();
}

4. MAKParametersContract (Contract Class):
[
    DataContractAttribute,
    SysOperationContractProcessingAttribute(classstr(MAKParametersUIBuilder))
]
class MAKParametersContract
{
    List  custAccountList;
}

[
    DataMemberAttribute("custAccountList"),
    AifCollectionTypeAttribute("custAccountList", Types::String),
    SysOperationLabelAttribute(literalStr("Customers"))
]
public List parmCustAccountList(List _custAccountList = custAccountList)
{
    custAccountList = _custAccountList;

    return custAccountList;
}

5. MAKParametersController (Controller Class):
class MAKParametersController extends SrsReportRunController
{
}

public boolean showPrintSettings()
{
    return false;
}

public boolean showQueryValues(str parameterName)
{
    return false;
}

public static void main(Args _args)
{
    MAKParametersController controller;

    controller = new MAKParametersController();
    controller.parmReportName(ssrsReportStr(MAKParametersReport, AutoDesign));
    controller.parmArgs(_args);
    controller.startOperation();
}

6. MAKParametersDP (Data Provider Class):
[
    SRSReportParameterAttribute(classStr(MAKParametersContract))
]
class MAKParametersDP extends SRSReportDataProviderBase
{
    MAKParametersContract   contract;
    TmpMAKParameters        tmpMAKParameters;
}

[
    SRSReportDataSetAttribute("TmpMAKParameters")
]
public TmpMAKParameters getTmpMAKParameters()
{
    select * from tmpMAKParameters;

    return tmpMAKParameters;
}

public void populateTmpTable(AccountNum _accountNum)
{
    CustTable custTable;

    while select custTable where custTable.AccountNum == _accountNum
    {
        tmpMAKParameters.AccountNum = custTable.AccountNum;
        tmpMAKParameters.CustGroup = custTable.CustGroup;
        tmpMAKParameters.insert();
    }
}

[SysEntryPointAttribute]
public void processReport()
{
    Query           query;
    QueryRun        queryRun;
    CustTable       custTable;

    contract = this.parmDataContract() as MAKParametersContract;

    query = new Query(queryStr(MAKCustTable));
    //query.dataSourceTable(tableNum(CustTable)).addRange(fieldNum(CustTable, AccountNum)).value(SysQuery::value(contract.parmAccountNum()));
    queryRun = new QueryRun(query);

    while(queryRun.next())
    {
        custTable = queryRun.get(tableNum(custTable));
        this.populateTmpTable(custTable.AccountNum);
    }
}

7. MAKParametersReport (SSRS Report):
Multi-Select Lookup
1. Create MAKParametersReport SSRS Report.
2. Create a new RDP dataset.
3. Select MAKParametersDP
4. Drag the dataset to the Designs node.
5. Save, build and deploy the report.

8. MAKParametersReport (Output Menu Item):
1. Create an output menu item MAKParametersReport.
2. Set ObjectType to Class.
3. Set Object to MAKParametersController

We are now good to run the report by clicking the menu item :)